Is your internet loading slower than it should, or do you keep landing on websites that feel oddly unsafe? The culprit might not be your Wi-Fi at all — it could be your DNS settings. Learning how to change DNS server settings is one of the easiest, most overlooked ways to speed up your browsing and strengthen your online security, and you don’t need to be a tech expert to do it.
Your DNS (Domain Name System) server acts like the internet’s phonebook, translating website names like “xcitium.com” into IP addresses your device can understand. If your DNS server is slow, outdated, or compromised, it can expose you to phishing redirects, DNS hijacking, and sluggish load times. In this guide, we’ll walk through how to change DNS server settings on Windows, Mac, and your router, plus explain why switching to a secure DNS provider matters for cybersecurity.
Why Changing Your DNS Server Matters for Security
Before diving into the steps, it helps to understand why this small setting has a big impact on internet security. Your Internet Service Provider (ISP) automatically assigns a default DNS server, but these default servers aren’t always optimized for speed or protected against threats.
Switching to a secure, trusted DNS provider can help you:
- Block access to known malicious or phishing websites automatically
- Reduce the risk of DNS spoofing and man-in-the-middle attacks
- Improve page load times with faster DNS resolution
- Bypass unnecessary ISP-level tracking and throttling
- Add an extra layer of protection against DNS hijacking attempts used in cyberattacks
For anyone focused on cybersecurity, this is a simple, high-impact change that takes just a few minutes.
How to Change DNS Server on Windows
Windows makes it straightforward to update your DNS settings through the Control Panel or Settings app.
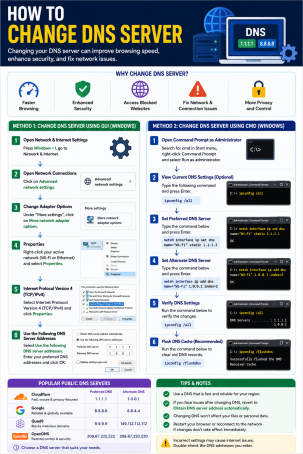
Steps to Change DNS Server on Windows 10/11
- Right-click the network icon in your taskbar and select Open Network & Internet Settings.
- Click Change adapter options.
- Right-click your active connection (Wi-Fi or Ethernet) and select Properties.
- Select Internet Protocol Version 4 (TCP/IPv4) and click Properties.
- Choose Use the following DNS server addresses.
- Enter your preferred DNS server addresses (for example, a public DNS provider’s primary and secondary addresses).
- Click OK, then restart your browser to apply changes.
This method lets you manually override your ISP’s default DNS server with a faster or more secure alternative.
How to Change DNS Server on Mac
macOS users can adjust DNS settings just as easily through System Settings.
Steps to Change DNS Server on macOS
- Open System Settings and click Network.
- Select your active connection (Wi-Fi or Ethernet) and click Details (or Advanced, depending on macOS version).
- Go to the DNS tab.
- Click the + button and enter your preferred DNS server address.
- Remove any outdated or unwanted DNS entries.
- Click OK, then Apply to save changes.
Once updated, your Mac will use the new DNS server for all future domain lookups.
How to Change DNS Server on Your Router (Network-Wide)
If you want every device on your home or office network to use the updated DNS settings — without configuring each device individually — changing DNS at the router level is the most efficient approach.
Steps to Change DNS Server on a Router
- Open a browser and enter your router’s IP address (commonly 192.168.1.1 or 192.168.0.1).
- Log in using your router’s admin credentials.
- Navigate to the WAN or Internet Settings section.
- Locate the DNS Server fields and switch from “Automatic” to “Manual.”
- Enter your preferred primary and secondary DNS addresses.
- Save changes and restart your router.
This network-wide DNS change is especially useful for households or small businesses looking to apply consistent internet security protections across all connected devices.
Choosing a Secure and Fast DNS Provider
Not all DNS servers are created equal. When deciding which one to switch to, consider these factors:
- Speed — Faster DNS resolution reduces page load times.
- Security features — Look for providers offering malware and phishing protection built into DNS resolution.
- Privacy policy — Choose providers with a clear no-logging policy to prevent tracking of your browsing habits.
- Reliability — A provider with high uptime ensures you rarely experience DNS-related outages.
Public DNS providers vary in their approach to filtering, speed, and privacy, so it’s worth comparing a few before settling on one for long-term use.
Common Issues When Changing DNS Server Settings
Even with the right steps, you might run into a few snags:
- Websites won’t load after the change — Flush your DNS cache using
ipconfig /flushdnson Windows or restart your router to clear cached records. - Old DNS settings keep reappearing — This usually happens when your router is set to “Automatic” and overrides manual device settings; make the change at the router level instead.
- Slower speeds after switching — Some DNS providers perform differently depending on your geographic location; test a couple of options to find the fastest one for your region.
Frequently Asked Questions (FAQ)
1. How do I know which DNS server I’m currently using?
On Windows, open Command Prompt and run ipconfig /all, then look for the “DNS Servers” entry. On Mac, check System Settings > Network > Advanced > DNS tab to view your current configuration.
2. Is changing my DNS server safe?
Yes, changing your DNS server is safe as long as you switch to a reputable, well-known provider. Avoid using unfamiliar or unverified DNS servers, as malicious DNS servers can redirect you to phishing sites without your knowledge.
3. Will changing my DNS server speed up my internet?
It can improve browsing speed by reducing the time it takes to resolve website addresses, though it won’t increase your overall internet bandwidth. The improvement is most noticeable in faster page load times, not download speeds.
4. Do I need to change DNS settings on every device, or just my router?
Changing DNS settings at the router level applies the change to every device connected to that network automatically. Changing it on an individual device only affects that specific device’s browsing.
5. Can changing my DNS server protect me from hackers?
A secure DNS server can reduce your exposure to certain threats like DNS hijacking, phishing redirects, and malicious domain resolution, but it should be used alongside broader cybersecurity measures like firewalls and endpoint protection, not as a standalone defense.
Final Thoughts
Now that you know how to change DNS server settings on Windows, Mac, and your router, you’re better equipped to boost your browsing speed and reduce exposure to common DNS-based threats. It’s a small configuration change with a meaningful impact on both performance and internet security.
However, DNS changes alone can’t protect your network from every modern cyber threat. For comprehensive protection against phishing, malware, and advanced network intrusions, it’s worth pairing secure DNS practices with a complete cybersecurity solution. Request a free demo with Xcitium today and see how end-to-end protection keeps your network secure well beyond DNS settings.
Please give us a star rating based on your experience.

 (22 votes, average: 2.14 out of 5, rated)