Did you know that over 240,000 new malware variants are detected every single day? As ransomware and credential-theft attacks grow more sophisticated, the hardware sitting inside your own computer may be your strongest line of defense — if you know how to turn it on. Learning how to enable TPM 2.0 is one of the simplest, highest-impact steps you can take to harden your device against modern cyberattacks, and it’s also a mandatory requirement for running Windows 11.
If your PC health check tool has flagged “TPM not enabled” or you’re preparing for a Windows 11 upgrade, this guide walks you through exactly how to enable TPM 2.0 in your BIOS or UEFI firmware, verify it’s working, and understand why it matters for your overall cybersecurity posture.
What Is TPM 2.0 and Why Does It Matter for Security?
TPM stands for Trusted Platform Module — a dedicated security chip (or firmware-based equivalent) that lives on your motherboard or is built directly into your processor. Think of it as a tamper-resistant vault that stores encryption keys, passwords, and digital certificates separately from your operating system, where malware and remote attackers can’t easily reach them.
TPM 2.0 is the current specification, offering stronger cryptographic algorithms and broader support for security features than the older TPM 1.2. For anyone focused on internet security and endpoint protection, this chip underpins several critical defenses:
- Hardware-based encryption for BitLocker drive encryption
- Secure authentication through Windows Hello biometric login
- Platform integrity checks that detect firmware tampering and rootkits
- Protection against credential theft, since keys never leave the isolated chip
Because it provides this hardware root of trust, Microsoft made TPM 2.0 a strict requirement for Windows 11 — without it, your PC either can’t upgrade or runs with reduced security protections.
How to Check If TPM 2.0 Is Already Enabled
Before diving into BIOS settings, confirm whether TPM 2.0 is already active on your system. Many modern laptops and desktops ship with it enabled by default.
Using the TPM Management Console
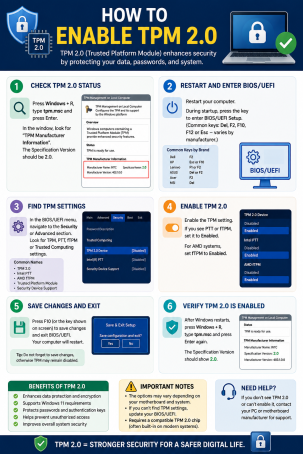
- Press Windows + R to open the Run dialog.
- Type
tpm.mscand press Enter. - Look under the Status section. If it reads “The TPM is ready for use,” your chip is active.
- Check TPM Manufacturer Information to confirm the Specification Version says 2.0.
Using Windows Security or PC Health Check
Open Windows Security > Device Security > Security Processor Details, or run Microsoft’s free PC Health Check app. Both will tell you instantly whether your device meets TPM 2.0 requirements or needs it enabled manually.
If either method shows TPM as missing, disabled, or running version 1.2, it’s time to enable TPM 2.0 through your firmware settings.
How to Enable TPM 2.0 in BIOS/UEFI
This is the core process for how to enable TPM 2.0 on most desktops and laptops. The exact menu names vary slightly by motherboard manufacturer, but the overall workflow is consistent.
Step 1: Restart and Enter BIOS/UEFI Setup
Restart your computer, and as it boots, repeatedly press your firmware access key — commonly F2, F10, F12, Esc, or Delete, depending on your hardware. Alternatively, go to Settings > System > Recovery > Advanced Startup > Restart Now, then choose Troubleshoot > Advanced Options > UEFI Firmware Settings.
Step 2: Locate the TPM Setting
Navigate to the Security, Advanced, or Trusted Computing tab, depending on your manufacturer:
- Intel-based systems: Look for “Intel Platform Trust Technology (PTT)” or “Security Device Support.”
- AMD-based systems: Look for “AMD fTPM switch” or “AMD PSP fTPM.”
- Dedicated TPM chip: Look for “TPM Device,” “Security Chip,” or “TPM State.”
Step 3: Enable TPM and Save Changes
Set the toggle to Enabled (or Available/Active, depending on the vendor), then press the save key — usually F10 — and confirm Save Changes and Exit. Your PC will restart automatically.
Step 4: Verify the Change
Boot back into Windows and rerun tpm.msc or the PC Health Check tool to confirm the status now reads “Ready for use” with Specification Version 2.0.
Enabling fTPM on AMD and PTT on Intel Systems
If your motherboard doesn’t have a discrete TPM chip, don’t worry — most CPUs made in the last several years include a firmware-based TPM (fTPM) built directly into the processor. Enabling this works exactly the same way: locate AMD fTPM or Intel PTT in the Security or Advanced tab, switch it to Enabled, and save. This firmware TPM provides the same cryptographic protection as a physical chip and satisfies Windows 11’s TPM 2.0 requirements.
Troubleshooting Common TPM 2.0 Issues
Even after you enable TPM 2.0, you might run into a few snags:
- Option is greyed out: Update your motherboard’s BIOS/UEFI firmware to the latest version from the manufacturer’s website first.
- Windows still shows “TPM not detected”: Some systems require a full shutdown (not just a restart) after enabling TPM, so the firmware initializes it correctly.
- Secure Boot conflicts: Windows 11 also expects Secure Boot enabled alongside TPM — check that setting in the same Security menu.
- BitLocker recovery prompt after enabling TPM: This is normal on encrypted drives; keep your recovery key handy before making firmware changes.
Best Practices After You Enable TPM 2.0
Turning on the chip is only the first step. To get the full cybersecurity benefit:
- Enable BitLocker or your OS’s native disk encryption to lock data to the TPM.
- Keep firmware updated regularly, since TPM and UEFI vulnerabilities are occasionally patched by OEMs.
- Pair TPM with endpoint protection software that monitors for firmware-level and rootkit attacks the chip alone can’t stop.
- Avoid disabling TPM later for troubleshooting unless absolutely necessary, since doing so can lock you out of encrypted drives.
Hardware-based security like TPM 2.0 works best as one layer in a broader defense strategy — not a replacement for antivirus, firewalls, or endpoint detection and response tools.
FAQ: How to Enable TPM 2.0
1. Do I need to enable TPM 2.0 to install Windows 11?
Yes. Microsoft requires TPM 2.0 as a minimum system requirement for Windows 11. Without it enabled, installation may be blocked or unsupported.
2. My motherboard doesn’t have a TPM chip — can I still enable TPM 2.0?
In most cases, yes. Modern Intel and AMD processors include a firmware-based TPM (PTT or fTPM) that can be enabled in BIOS settings without any additional hardware.
3. Will enabling TPM 2.0 slow down my computer?
No. TPM operations run on a dedicated low-power chip or isolated CPU function and have no measurable impact on system performance.
4. What happens to my files if I disable TPM after enabling BitLocker?
Disabling TPM can trigger a BitLocker recovery prompt, requiring your recovery key to unlock the drive. Always back up your recovery key before changing TPM settings.
5. How do I know if my TPM 2.0 is working correctly?
Run tpm.msc from the Windows Run dialog. If the status reads “The TPM is ready for use” with Specification Version 2.0, it’s active and functioning correctly.
Strengthen Your Endpoint Security Beyond TPM
Enabling TPM 2.0 is a critical foundation for hardware-based security, but it’s only one piece of a complete cybersecurity strategy. Sophisticated threats like ransomware, zero-day exploits, and fileless malware require layered, proactive protection that goes beyond what firmware alone can offer.
See how Xcitium’s advanced endpoint protection can complement your hardware security and keep your organization safe from modern threats. Request a demo today and take the next step toward complete cyber resilience.
Please give us a star rating based on your experience.


 (19 votes, average: 2.26 out of 5, rated)