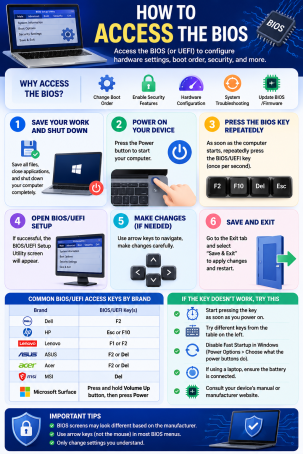
Ever tried to enable a security feature like TPM 2.0 or Secure Boot, only to get stuck not knowing how to even open the settings menu that controls it? You’re not alone — one of the most common troubleshooting questions in cybersecurity forums is simply how to access the BIOS. This low-level firmware interface controls everything from your boot order to critical hardware-based security features, yet most users only encounter it once or twice in a computer’s lifetime.
Whether you’re locking down your device against modern threats, installing a new operating system, or troubleshooting a hardware issue, knowing how to access the BIOS (or its modern equivalent, UEFI) is a foundational skill for anyone serious about protecting their PC. This guide breaks down every method, by manufacturer, so you can get in quickly and safely.
What Is the BIOS and Why Does It Matter for Security?
BIOS stands for Basic Input/Output System — the firmware that loads before your operating system, initializing your hardware and handing off control to Windows, macOS, or Linux. On most computers made in the last decade, this has been replaced by UEFI (Unified Extensible Firmware Interface), a faster, more secure, and more flexible successor that still gets referred to informally as “the BIOS.”
From a cybersecurity standpoint, the BIOS/UEFI menu is where several critical protections live:
- TPM 2.0 (Trusted Platform Module) for hardware-based encryption
- Secure Boot, which blocks unsigned or malicious bootloaders from running
- Virtualization settings, needed for sandboxing and endpoint protection tools
- Boot order and password protection, which prevent unauthorized physical access
Because this firmware sits beneath your operating system, it’s also a prime target for sophisticated attacks like bootkits and firmware-level rootkits — malware that can survive a full OS reinstall. Knowing how to access the BIOS lets you audit these settings, apply firmware updates, and close off an attack surface most antivirus software can’t reach.
How to Access the BIOS Using a Startup Key
The fastest and most universal way to access the BIOS is by pressing a specific hotkey during your computer’s startup sequence, before Windows begins to load. This window is brief — typically just a few seconds — so timing matters.
Step-by-Step Instructions
- Restart or power on your computer.
- Watch for the manufacturer logo screen. Many systems briefly display a message like “Press F2 to enter Setup” or “Press DEL to enter BIOS.”
- Repeatedly tap the correct key (don’t hold it down, as this can cause the system to skip past the prompt on some boards).
- Release once the BIOS/UEFI interface loads. If you miss the window, simply restart and try again.
Common BIOS Access Keys by Manufacturer
Since the correct key varies by brand and even by product line, use this quick-reference table:
| Manufacturer | Common BIOS Key |
|---|---|
| Dell | F2 or F12 |
| HP | Esc or F10 |
| Lenovo (Laptops) | F1, F2, or Fn + F2 |
| Lenovo (Desktops) | F1 |
| ASUS | F2 or Del |
| Acer | F2 or Del |
| MSI | Del |
| Gigabyte | Del or F2 |
| Toshiba | F2 |
| Samsung | F2 |
If none of these work, check your device manual, or watch closely for the on-screen prompt during the next restart — it will usually tell you exactly which key to press.
How to Access the BIOS Through Windows Settings
If your PC boots too quickly for you to catch the startup prompt — common on newer laptops with solid-state drives and fast boot enabled — you can reach the same firmware menu directly through Windows.
Using Advanced Startup
- Open Settings > System > Recovery (or Update & Security > Recovery on older Windows versions).
- Under Advanced Startup, click Restart now.
- Once your PC reboots to a blue menu, select Troubleshoot > Advanced Options > UEFI Firmware Settings.
- Click Restart to boot directly into the BIOS/UEFI interface.
This method is especially useful for troubleshooting security settings like Secure Boot or TPM without fighting a narrow timing window at startup, and it works reliably across most modern Windows 10 and Windows 11 devices.
Troubleshooting: What to Do If You Can’t Access the BIOS
Sometimes the standard methods don’t work on the first try. Here’s how to resolve the most common issues:
- Fast Boot or Ultra Fast Boot is skipping the prompt. These features shorten startup time by bypassing hardware checks. Use the Windows Advanced Startup method above instead, which bypasses the timing issue entirely.
- Your keyboard isn’t being recognized at startup. Try a different USB port — ideally USB 2.0 rather than USB 3.0 — since some motherboards initialize drivers at different speeds.
- You’re not sure which key to press. Try cycling through F1, F2, F10, F12, Esc, and Delete on a restart, since virtually every manufacturer uses one of these.
- The system boots straight into Windows every time. If Fast Startup (a Windows-level hibernation feature) is enabled, a full shutdown followed by a cold boot often gives you a longer window to catch the prompt than a simple restart.
Best Practices Once You’re Inside the BIOS/UEFI
Getting into the BIOS is only half the job — what you do once you’re there matters for your overall internet security posture:
- Set a BIOS/UEFI password to prevent unauthorized changes if your device is lost, stolen, or accessed by someone else.
- Enable Secure Boot and TPM 2.0 if they aren’t already active, since both are foundational to modern endpoint protection.
- Check for firmware updates from your manufacturer’s support site before making changes, since outdated firmware can contain unpatched vulnerabilities.
- Document any changes you make and use the correct “Save and Exit” option, since incorrect settings can occasionally prevent a system from booting.
FAQ: How to Access the BIOS
1. What’s the difference between BIOS and UEFI?
BIOS is the older, text-based firmware standard, while UEFI is its modern replacement, offering faster boot times, support for larger drives, and stronger built-in security features like Secure Boot. Most computers made after 2012 use UEFI, though it’s still commonly called “the BIOS” out of habit.
2. Why can’t I access the BIOS on my laptop?
This is usually caused by Fast Boot or Windows Fast Startup skipping the hardware initialization prompt. Use the Windows Advanced Startup method to reach the firmware menu directly instead of relying on a startup hotkey.
3. Is it safe to change settings in the BIOS?
Yes, as long as you only change settings you understand, such as enabling TPM or Secure Boot. Avoid altering voltage, clock speed, or memory timing settings unless you’re experienced, since incorrect changes can cause instability.
4. Do I need a password to access the BIOS?
Not by default, but you can set one from within the BIOS/UEFI menu itself. This is a recommended security measure to prevent unauthorized users from disabling protections like Secure Boot on a shared or portable device.
5. Can I access the BIOS without a keyboard shortcut?
Yes. If your keyboard isn’t responding at startup or the window is too short to catch, use the Windows Advanced Startup method (Settings > System > Recovery > Advanced Startup > UEFI Firmware Settings) to reach the same interface.
Take Your PC Security Beyond the BIOS
Knowing how to access the BIOS puts foundational, hardware-level security settings within your control — but firmware protections alone aren’t enough to stop today’s evolving cyber threats. Ransomware, fileless malware, and advanced persistent threats require continuous, intelligent monitoring that goes far beyond what any firmware menu can provide.
See how Xcitium’s advanced endpoint protection works alongside your hardware-level defenses to keep your devices and data secure. Request a demo today and build a complete, layered cybersecurity strategy.
Please give us a star rating based on your experience.


 (16 votes, average: 2.50 out of 5, rated)